If the Shoe Fits: Matching the Enclosure to the Vehicle
DD Audio Tech Talk | WRITTEN BY AARON TRIMBLE | 25 May 2017
We’ve all seen the DD Box system right? Work within the 1.5:1 and 3:1 ratios for port size based on the cone area of the woofer then divide it by 16 to find your net airspace… No? Well those of you who’re not DD Techies, check out last December’s Tech Talk, “Does Size Really Matter“, first! No, no it’s fine, we’ll wait.
Did you read it? Ok, great!
So, we all know that the DD Box system is a great way to get a massive performance boost over the conventional prefabricated enclosure, but did you know that you can take it a step further? That’s right, we can manipulate the system to fine tune your enclosure for just the right kind of heart pounding bass you’re looking for.
Let’s say you’re a looking for a well rounded musical set-up. You know, something that can smash on the lows, but doesn’t sacrifice performance in the top end. The 808 sounds just as good as the kick drums. Well let’s take a look at your vehicle. A Ford Focus sedan and a Chevy Tahoe are very different vehicles, not just in the way they drive, how many people they can seat or their MPG, but also the way they sound, and I’m not talking about the exhaust either. What we’re concerned about is the vehicle’s internal acoustics. Generally speaking, larger and/or longer vehicles will have a lower natural resonance, whereas smaller vehicles, and in a lot of cases, older vehicles, will tend to have higher natural resonances. Knowing this we can plan ahead. If we’re in a smaller vehicle that reinforces high frequencies well we can tune our enclosure lower. Additionally, if we have the space to sacrifice, we can also use a larger cabinet for the sub to play in to really accentuate the low bass response in the vehicle that would otherwise be lacking. Conversely, if we’re in a larger vehicle, like the Tahoe, that naturally reinforces low frequency play we can get away with tuning the enclosure higher to give the vehicle a more well rounded performance. Smaller enclosures can also be helpful in this application to provide a more responsive top end play.

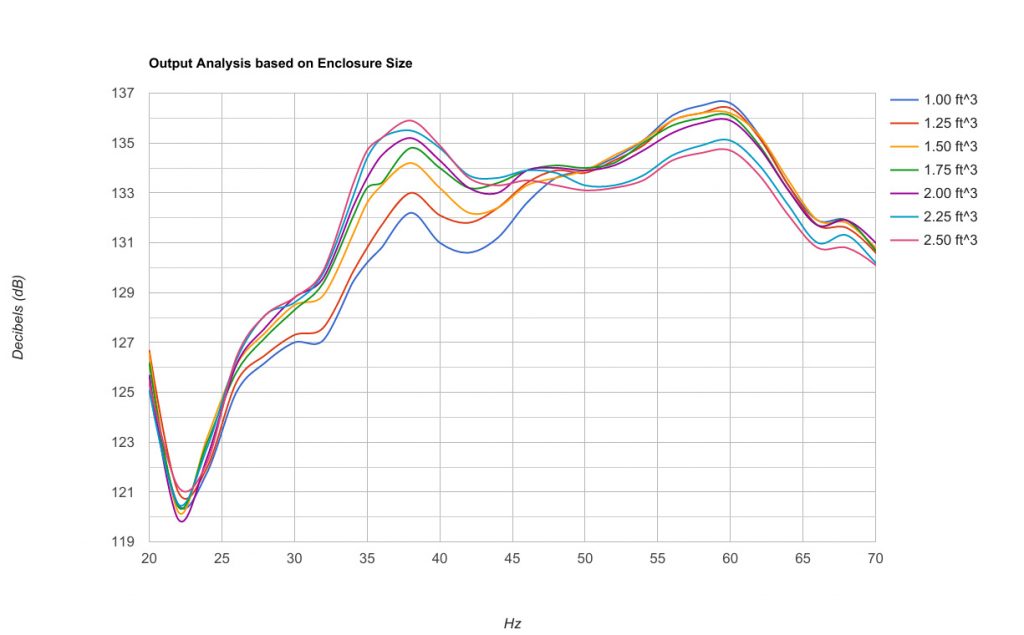
In the graph above you can see some very interesting things. This vehicle is a 1986 Isuzu Trooper with our favorite 3510 in it in a variety of differently sized enclosures. Each enclosure is tuned at 35 Hz. This vehicle is great at showing exactly how a vehicle with a high natural resonance can affect the performance of a system. Be mindful that this car is quite large, but it’s also fairly old and has a lot of windows and flat panels. This vehicle reinforces a lot of high frequencies, and its peak in this case is at 60 Hz. Because of this, enclosures that are larger than normal for their respective woofers and enclosures that are tuned lower will round out the performance of this vehicle without the use of equalization better than smaller or more highly tuned enclosures.

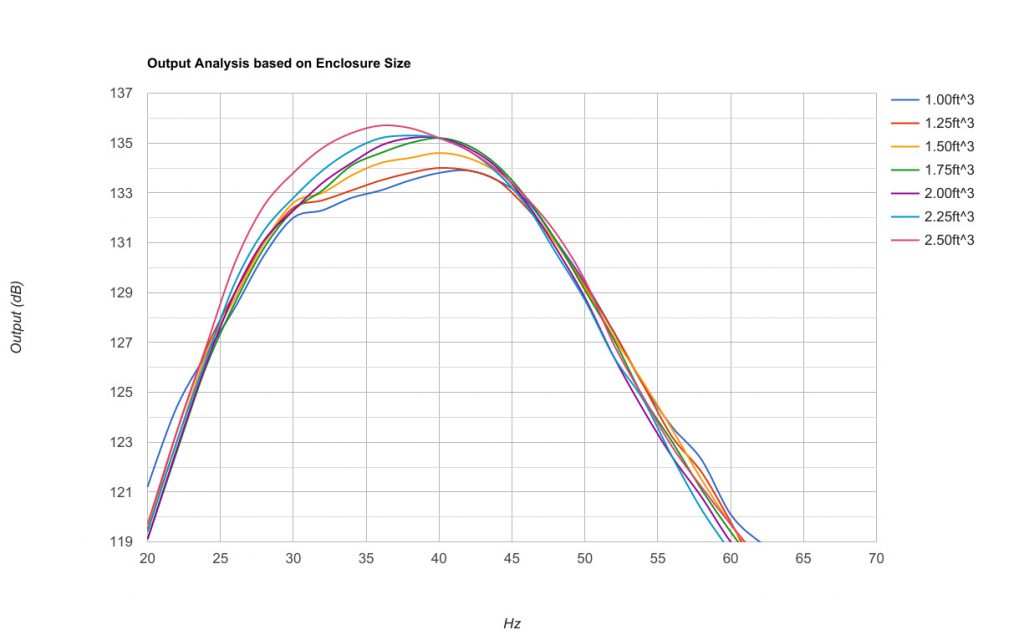
If we compare the Trooper to a 2016 Porsche Macan that we used in the December article, using the same test boxes, you can see there is less deviation in output across the sub range than there was in the Isuzu. The Porsche, being newer, with more well dampened interior panels, despite being smaller, has a much lower acoustic resonance. Since the Macan’s peak is closer to the 40 Hz range, if we used an enclosure tuned lower than our 35 Hz test enclosures it would yield a wider bandwidth.
Now, if rules of thumb aren’t your thing, and you’re looking to be more accurate in determining how your vehicle responds to bass, you can take it to the next level. You’ll need a sealed enclosure and a woofer that fits in that sealed enclosure. Additionally you’ll need your smart phone with a dB meter on it (or a Termlab if you’re lucky enough to have access to one) and a handful of test tones. Load the woofer into the sealed enclosure and place it in the future location of your new subwoofer set-up. From the driver’s seat with your dB meter handy, play the lowest frequency you want your new system to play at a moderate volume and measure how loud it is. Next go up a couple of frequencies and play the system again, be sure to measure the output again. It’s best to record these numbers as you continue your testing. Continue testing and recording frequency outputs until you reach the top frequency that you’re interested in playing. It’s important that you don’t change any settings on the amp or the radio like volume or EQ while you’re testing. Once you’re done you can see where your vehicle’s peak frequency is at, and how your vehicle reacts with the given sub and enclosure set-up. The reason we use a sealed enclosure for this test is because the sealed enclosure is going to have a naturally flatter response than a ported or even a bandpass enclosure without knowing the environment that the sub is playing in. Once you have this data, you can more accurately determine how to approach your real enclosure.
So, when you get ready to build your next enclosure, keep your vehicle in mind. Is it large? How new is it? Does it have well dampened paneling or is it mostly card stock like a classic vehicle? All these things can affect the performance of your new sub system, and a well designed enclosure that matches the car can turn a system from something that is loud into something that’s loud, and sounds amazing.